Thursday, March 7, 2013

Hurricane Sandy Mission Trip


One of the men from work has been instrumental in arranging and leading groups from a local church on numerous mission trips to New Orleans to help rebuild homes damaged as a result of the horrible Hurricane that stuck there a number of years ago.

This year, the group decided to direct their efforts towards Hurricane damage a little closer to home: the New Jersey shore destruction caused by Hurricane Sandy.  It has only been a few months since the disaster and the infrastructure in NJ for directing aid to people in need is not yet as well established as one might hope.  There were a number of starts and stops before they could connect with a group with sufficient organization to make the trip productive.  Once they did, my friend asked me to provide carving for them to take along as I have done in the past.   

Traditionally, the group votes the last night of the trip on who should receive the carving – whether it should be one of the families that they helped or the local group that made it possible.  Since they are not back yet, I still don’t know who received it.

As a postscript, while there were there this week, the group got to experience some of the very same weather problems that they went to help repair.  I hope all is well.

So here it is:


The carving is based on a portion of the NJ group’s logo.  Not much else to say about it.  Since I really can’t do too much to help out physically, it makes me feel good that I can help them celebrate their efforts.

'Til next time...Keep makin' chips!

Sunday, February 10, 2013

Another 1000 hits!

Wow!

I just checked this morning to discover that we have topped the 8000 mark in blog hits.  Those numbers are continuing to add up.

I find it heartwarming that many of the hits are repeats...well, at least from the same hometown so I counting them as repeats.:-)

Let me know if there is something in particular you would like to hear about.

Thanks again for stopping by.

'Til next time...keep Makin' Chips!

Saturday, February 2, 2013

History Lessons and My Finished Locomotive and Tender


First, the history lessons…
 
I work in the Turtle Creek Valley located just a few miles east of the City of Pittsburgh, PA in the community of East Pittsburgh – a really innovative name for a town, huh?:--)  The enormous Westinghouse Air Brake (WABCO) factory built there in 1889.  It was and still is a sprawling collection of buildings of all sorts occupying hundreds of acres covering nearly all of the flat land in the valley. 

The plant employed thousands of workers.  “Back in the day,” raw materials, like steel from the Edgar Thompson plant just a mile or two down the valley in Braddock, came in one end of the plant and thousands of locomotives, rail cars and all other manner of railroad related equipment poured out the other.  East Pittsburgh is one of several communities that grew up around the plant so people would have a place to live.  Westinghouse moved WABCO up the valley to the nearby town of Wilmerding many years ago.  The original buildings abandoned by Westinghouse are now an industrial park filled with many newer, smaller companies. 

Despite being a place that most people have never heard of, East Pittsburgh can claim the title of being the birthplace of commercial radio as we know it today.  On November 2, 1920, KDKA went on the air as the first “regularly scheduled radio station” to broadcast the US presidential election returns from a shack located on the roof of the K Building of the Westinghouse factory property.  That building is gone now but I can see where it used to stand from my office.

Some time ago, I created a fictitious railroad that I called “The Pittsburg, Homestead and Wilmerding Railroad”. The name has popped up in some of my previous works, for example on the station where the conductor Ollie Bord worked.  My reasons for selecting this name and loco number selection will, for the purposes of this blog, remain my secret but suffice it to say that anyone who I work with will have no trouble understanding their significance. 

All these towns actually exist. The City of Pittsburgh lies about 8 miles west of East Pittsburgh.  Homestead is an old steel town located west along the Monongahela River about halfway between Pittsburgh and where the Turtle Creek valley starts. And Wilmerding is located just slightly to the east.

You will notice that I intentionally spelled “Pittsburgh” in the railroad’s name without the “h”.  When Pittsburgh was originally founded in 1758 in honor of William Pitt the name included the final “h”.   Then, in 1890, Pittsburgh was stripped of its “h” by President Benjamin Harrison’s Board on Geographic Names and lumped in with all of the other cities and towns in the US already named “Pittsburg”.  The proud citizens of Pittsburgh, PA would have none of this and created such a fuss that the Board finally relented and restored the 'h' to Pittsburgh in 1911.  But since the truncated spelling would have been in effect during the hay day of my fictitious railroad (late 19th century to early 20th century), I chose to adopt it.

Now, on to the Locomotive and Tender…

One of my followers is quite an accomplished Model Railroader and has created some really amazing buildings and rolling stock for his layout.  You can check out some of the really cool stuff that he has done on his blog.  I’m pretty sure that the level of detail, accuracy and/or overall craftsmanship of my locomotive and tender doesn’t begin to measure up to his but personally, I’m pretty pleased with the final results.

I mentioned in one of my recent posts that I wasn’t all that excited about the all black paint job on the original Empire State Express and that I was planning to go a little “brighter” with my paint job.  In retrospect, I may have kind of overdone it.  The abundance of “tomato” red is a bit much, but I wanted pizazz and “pizazz” is what I got.

Another irony in my name selection is that the Empire State Express locomotive was equipped with 86" diameter drive wheels and set a land speed record of 112.5 mph in 1883.  It is hardly the sort of locomotive that one needs for a little short line like the PH&W would need for its perhaps 10 to 20 miles or right-of-way, but maybe they got a good deal:-)  
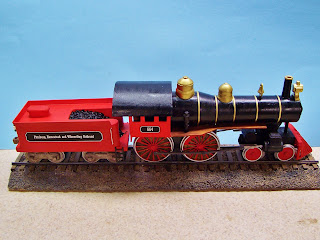
Full Side view
Here is an overall shot.  Yes, I even put coal in the tender (bird cage gravel, glued to a shaped block of wood and painted black).  

You can see the “rolled tar paper” effect that the fine grit sandpaper glued the roof creates.
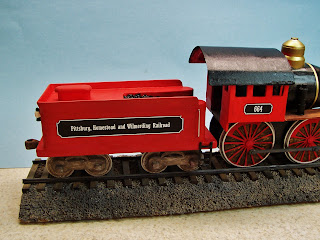
Lettering on Tender and Loco


I’m not much for lettering on models.  I took the easy way out and created the signage in PowerPoint, cut them out and just glued them on.  
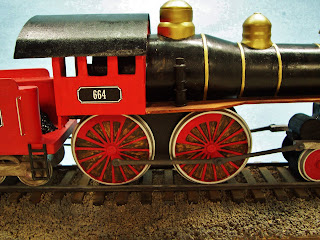


Drive Wheels


The spaces between the spokes of the drive wheels that are supposed to be "open" ( but can't be without jeopardizing structure strength) show up more in this photo than they do when you see the actual piece. 
I may have to go back and darken them up some to make them “disappear” a little better.


Even the nose has a number.

As my wife and I discussed at lunch today, I think that we need a couple of characters to demonstrate just how big this loco is.  So, I may not be quite done after all.


Hope you like what you see.

'Til next time...Keep makin' Chips!

Friday, January 18, 2013

Patterns of Love Spoons

For those of  you who don't know, the blog counter at the bottom of the page lets me know where the viewers are location [By city and country only, so don't worry.  I don't know where you live and won't be showing up at your doorstep anytime soon:-) ].  It also indicates what people were searching for when they found my blog.

Based on this information, I am pleased to see that there are so many people -- particularly in the UK -- who seem to like my Lovespoon patterns. I find that very gratifying.  There is even a guy in Portugal (I think it is) who is carving my spoons for sale on the Web, so he must really like them:-)  But, that is OK with me.  The patterns are there for you to use.

If you do choose to use one of my patterns, how about sending me a picture.  I'd like to see your work.  Consider that my "fee" for using the patterns.

In addition, I am pleased to report that readership is way up in the past few weeks, so maybe I'm doing something right.  If you like what you see more "how-to" stuff or would like more (or less) information, leave a comment I'd love to hear from you.

'Til next time...Keep Makin' Chips!

Wednesday, January 16, 2013

Empire State Express – Now, Get Back to work!


The thing that had made me procrastinate as much as I did about getting back to finishing the Empire State Express was the daunting task of having to make all of the wheels for the tender.  I hate doing anything that is repetitious and turning 8 small, boringly identical wheels on the lathe just didn’t thrill me at all.  The set for the loco (8 wheels, 2 sizes) took me an entire afternoon to turn.  But, at one point last Saturday afternoon I stood up and marched down to the lathe determined to get them out of the way.  
 
As it turned out -- no pun intended -- once I figured out the technique, I was able to zip off 9 of the little rascals in just a bit over 90 minutes without even breaking a sweat.  In fact, it was so much fun that I went down to the lathe again a day or so later and made one more and took photos for this blog article.

So here is my simple, step-by-step procedure for making small wheels for any sort of model that won’t make you procrastinate like I did.

The first thing that you have to understand is that the grain must run across the face of the wheel so that it maintains at least some sort of structure strength.  You “could” cut the wheels out of a dowel rod of correct diameter but the problem there is that the grain would run through the wheel not across.  Even though the dowel rod might be made of maple any stress on the wheel would still snap it in half.

Now you may have a better chuck than I do or, even better, a steady rest for your lathe.  If so, you can start with a smaller cross-section block than I could.  But in order for me to grab the billet tight enough to allow the turning of a long, spindly, wheel blank, I had to start with a larger (in this case about 2-7/8” square) block (about 5 inches long) that I attached to my smallest faceplate.  The wheels are only about 1/8” thick so even including the material lost in parting off the wheel you can see that I was expecting a lot of rejects.  As it turned out, I only had one failure and in a pinch I could even use that one.

I turned the block round and the “free end” down to my desired 1” diameter.  Once it was round, I left the drive end of the block at nearly the original size to provide a nice solid support base to minimize vibration.  For the heavy roughing out, I supported the “free end” with the live center in the tail stock.  By the way, for best results, keep your tools as close to “scary sharp” as possible.  Basswood is so soft that you need sharp tools to keep from tearing the wood.

After backing the tail stock out of the way I drilled a 1/8” hole into the end.  From this point onward I kept the speed down to about 50 or 60 RPM to avoid excessive vibration in the block.  If you have a steady rest for support you probably don’t have to worry about that and can probably run faster.

To start making the wheel, face off the end of the block so that it is smooth and flat.  A round nose scraper worked best here for me.  


Switch to a small spindle gouge to cut the “Cone” of the wheel.  At this point you could make careful measurements but as I discovered, “eyeball” measurements are close enough for this sort of thing.


Next, switch to a Skew chisel to cut the face of the wheel.  Gently move the tip of the Skew in to produce the rim of the wheel.  Here you are using the skew like a scraper because you are shaping the entire surface of the wheel at once. 


 Here you can see the finished wheel face.


The next step is to use a standard parting tool to define the wheel flange and begin to shape the cone of the next wheel to be cut.  This shot is a bit fuzzy but you can see how the second wheel is already starting to take shape and we’re not even done with the first one yet!


This step is probably going to raise eyebrows with wood turners.  I am positive that this is not considered to be orthodox lathe operation, but it works -- at least at the low speeds that I am using.  I first did this because my parting tool is wide and I didn’t want to waste any more available block length than was absolutely necessary.  I held the teeth of a hacksaw up against the back of the wheel flange and used it as a parting tool. 

It quickly cuts a very narrow groove.  You can see how narrow it is in this photo.


Finish parting off the wheel.  The back side of the wheel will be very rough but a few seconds on a piece of 100 grit sandpaper will smooth it right out. 


So the first wheel is done, short of a little sanding with 220 or 320 sandpaper.  Best of all, the next wheel is already about half done.  Face off the block, dress up the cone (if necessary) then face off the wheel and part it off.  Like I said, I did 9 in 90 minutes.  You can, too.  Here they are: 

One for the Bench


Promise only what you can deliver. Then deliver more than you promise. - Anonymous


‘Til next time…Keep makin’ chips!


Tuesday, January 15, 2013

Empire State Express – Status Update


As a result of some repainting at our house and the subsequent furniture moving, we went through a shuffling of my carvings to bring out some of the previously unseen pieces and retire some of those that had been in the curio cabinets for some time.

As a result of all of the shuffling, some of the shelves were repositioned and room was left on the top (eye level) shelf for the Empire Express Locomotive and Tender that I spoke about making.  
When I later checked back into my blog to see when I last posted about it,  I was shocked and embarrassed to see how long it had been.  This fact and the now empty shelf space waiting for a Train model galvanized me into resolving to do finish. 

For the record, I did get most of the locomotive done before I shelved the project temporarily - see the photos below.

In the left rear view you can see the air pump, drive rods and the roof of the cabin.   I used a piece of 320 grit sandpaper for the roof – rough side up, I’ve done this before.   Once painted black, it looks pretty much like roll tar paper. 

Obviously, I still need to do some additional painting.  The “real” Empire State Express was all black and to be perfectly correct the model should be, too, but let’s face it, Black Locomotives are boring :-) so I plan to use some color to make it more interesting.  Yeah, it’s not historically correct but it will be more eye-catching in the curio cabinet.


The front side view shows the cowcatcher and the brass steam and sand domes, bell and headlight.  That is about as much detail as I plan to add, although the final locomotive may have an Engineer on board.


The next post will be a "how to" for making train wheels.  Stay tuned...