You may recall from earlier this year, I posted a bit about, Scott, a ventriloquist friend of mine who gave a very nice presentation about how to carve and paint dummies at our carving club. It was quite a nice evening.
I think that I mentioned at the time that his church (Scott is one of the two Pastors there) was in the process of adding a 6000 square foot addition onto their building and completely renovating their sanctuary. They have done a nice job. It really looks fantastic now!.
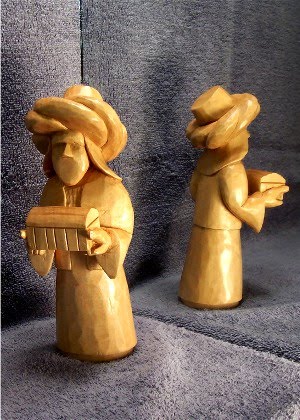
I promised him that I would make a "housewarming gift" to commemorate the new addition. Since then I have been trying to come up with an original idea and finally decided to fall back on a previous design, or at least something based on a previous design, the Dove and the Rainbow and the picture shows the final product.
The proportions of my previous efforts (this one is the third) have always bothered me. The rainbow was too short and too wide. I managed to beg borrow and steal...well, not actually "steal"...chunks of a number of different types of wood for the rainbow. This rainbow is about twice a long as the previous ones, about 2/3s as wide and has an additional stripe. I would have like to have even more stripes but the colors of the wood I was able to find just weren't varied enough to merit it. The species of wood, from top to bottom are: Bloodwood, Cherry, Butternut, Oak and Purpleheart.
I wanted to have a place to add a little brass plate with the title and appropriate bible verses, so I added the cloud. The dove and the cloud are both carved from basswood.
One of the people that my wife works with reminded me that I really needed to add an olive branch. I had thought of the before but this time I bent one up of tinned copper wire, filled in the leaves with solder and superglued it in place. I think it was a nice touch although any similarity between it and a real olive twig is purely coincidental.
I hope you like it. One from the Bench:
Think like a man of action, and act like a man of thought.
To say the least, my daytime job is often "a bit different" from what most people experience in their lifetimes. Here's one reason why:
My company makes electronic signal equipment for the railroad industry. Quite a number of years ago my bosses decided to shoehorn some of our equipment into a Garden "G" Gauge model train so that they could demonstrate its operation on a moving (albeit small) train at trade shows. Over the years the train display has grown in size and complexity. The latest iteration measures 10 feet by 30 feet and has a bit more than 80 feet of track in sort of a "flattened dog bone" shape. The rear edge alone has 2 mainlines and 2 sidings, each more than 15 feet long!
Over the past few weeks it has actually been my job, if you can call it that, to spend my time cutting and fastening the track with foam rubber track bed on the new display. Yeah, I know. It's a tough job, but somebody's gotta do it!
The display is pretty much devoid of any scenery except for a couple pieces of wayside equipment, e.g., the signal lamps. The longer I worked on the track and the more I thought about it, the more it seemed to me that the signal lamps that we have used for years just didn't quite measure up to the standards of the new display, so I decided to make some replacements. The picture shows one of the four new signal lamps that I built.
I am sure that there are those who would slavishly conform to the required scale to ensure authenticity in all model train projects. I realized early on that, although all 4 of our trains are all considered "G" gauge trains, none of them were built to exactly the same scale. So, no matter what scale I chose, it wouldn't be quite right. Instead, I just sort of "eyeballed" the scale and made the signal lamps about 7 inches tall or about even with the average cab roof.
Originally, I had planned to blather on here with a blow by blow description of how I put it together on the off chance that someone might want to actually duplicate them. After a sobering evening's reflection I realized that anyone who was that interested could just look at my annotated photo and glean everything they need to know to duplicate what I did. If you want more info than that, just drop me an e-mail. I can probably tell you much more that you will want to listen to.:-)
The display will debut in September in Minneapolis (?) and then be disassembled and rushed to another show in New Orleans (?) just a week or two later. Now, on to the wiring...
One from the Bench:
Don't let your victories go to your head, or your failures go to your heart.
I mentioned a posting or so ago that I started and was working on a spoon with the theme of The Loaves and the Fishes? while I was participating in the recent Christmas craft show. One of the two women who had the table immediately to my left showed a considerable amount of interest in my progress as the two days went by. As we were packing up she asked if I would keep her informed as to my progress because she thought that it would make the *perfect gift* for (name withheld). I gave her my card and suggested that she call me in a week or so and I would be able to give her a progress update.
I finished carving the spoon a day or so later, sanded it and gave it the first coat of finish but then it sort of languished because I got involved with another project which will be the subject of my next posting. I was jolted back to reality when the woman called early this past week -- as she said she would -- to ask when it would be completed. With Thanksgiving on the horizon and the Grandkids coming into town, I wasn't sure that I would be able to deliver it until after this coming weekend. I did, however, assure her that I would have it done in plenty of time for Christmas.
As it turns out, the intervening project wrapped up more quickly than I expected so I was able to quickly get back to the spoon. I completed it today. So, here it is: The Loaves and Fishes Spoon.
One for the Bench:
Knowledge talks, wisdom listens....I'm doing all of the talking here...hmmmm...I'm not sure what that says about me :-)
The following is an editorial comment from the management of Carvin' Tom Woodcarving Blog. Those easily offended should avert their eyes from the screen...So, are the eyes of everyone who doesn't want to see what I have to say averted??? OK, here goes...
I guess I'm just getting old and crotchety, but these days I am just aghast at how otherwise intelligent people cannot seem to assemble a sentence that says what they really mean to say, for example:
During the news broadcast this morning I heard the (I'm assuming well-intentioned) announcer (who you would think had some mastery of the English language) say,
"It's Veteran's Day and there will be ceremonies honoring those veterans who lost their lives in cemeteries throughout the land."
...so does that mean that if those veterans had just had the sense to not wander into a cemetery they would be alive today? Or did he really mean to say,
"It's Veteran's Day and in cemeteries throughout the land there will be ceremonies honoring those veterans who lost their lives."
You'd think, particularly considering the intended message, that he could have gotten it right.
To all of my fellow Veterans, "Thanks, for a job well done!"
I'm feeling much better now...
'Til next time...Keep makin' chips -- and correcting deficient English
The show went very well. A long evening on Friday and a good day on Saturday. I understand that upwards of 1000 people filed through to see what was for sale. Not bad! I could have sold more but I'm happy with what did go. At first I was concerned that I had too high a price on the Birdhouse Christmas Ornament but felt better about it when I saw that people were actually buying them in pairs. So at least for some folks the price was right. I'm guessing too that there were a lot of pairs of Grandkids out there that will be getting Ornaments as part of their Christmas. I haven't yet decided whether to do it again next year. It seems that I spent a lot of time this year making stuff for the show and not enough "just for fun". I'll have to think on that some while I carve. I was working on a new design as I sat there. A spoon with a "Loaves and Fishes" theme to the handle. I wish that I had a couple of them because people really seemed to find them interesting. The spoon is almost done -- I'm sanding and have put the first coat of finish on it. I'll post it as soon as I'm done.
One from the Bench:
You're never too old to learn something stupid! 'Til next time...keep makin' Chips!
If you recall I hadn't been posting too many new things because I have been busy making items for an upcoming Craft Show. Well, here is one of those items: Turned Wooden Birdhouse Christmas Ornaments.
I can't take all of the credit for what you see because, by and large, I stole the techniques lock, stock and barrel from an on-line article by Eugen Schlaak at www.woodturningonline.com/Turning/Turning_content/Bird House.pdf (Note: You might have to copy that link and paste it into your browser, clicking on this Hyperlink seems to be problematic, at least for my browser.).
However, I do claim a little credit for one enhancement that I made to his technique and for some added, hand-carved touches. I suggest if you would like to make one (or more) of these delightful ornaments that you start with his excellent instructions and then augment them with my suggestions.
Enhancement: The Use of "Jam Chucks"
I tried following Eugen's directions but I don't have a cool mini-fingered chuck like his, so I had difficulty gripping the narrow edge of the partially turned piece when I reversed it for the final steps. It kept popping off if I put even a small amount of pressure on the wood as it turned.
So, I ended up turning two "Jam Chucks" to hold the two pre-drilled blocks, one for the roof and one for the "body" of the house. Strictly speaking, I guess these aren't really "Jam Chucks" because a true jam chuck uses only friction to hold the wood and these have an internal, hidden screw to lock everything down. So, for the purpose of this blog I guess these should be considered "Screw Chucks" although I have never seen that expression used.
The first chuck is 1" in diameter to fit the hole that is drilled into the bottom ("body") block. The second one is 1.25" in diameter to fit into the top ("roof") block. Since it is considered "bad form" to show up at the local wood turner's club (or anywhere else for that matter) with bloodied knuckles, when you make your chucks be sure to make the "neck" on each of them long enough ensure that the rotating lathe chuck jaws can't scuff up your knuckles while you're turning or sanding.
As I mentioned, the thing that really holds the wood block in place is the long woodscrew that runs through the middle of the jam chuck. Drill a dead-center hole through the chuck and countersink it deep enough to permit a long #10 woodscrew (or bigger) to stick about 1/2" out the "business end" of the chuck when fully cranked down. The direction of the woodscrew threads causes the block to tighten onto the screw chuck as the lathe tools work against the wood so the block actually becomes tighter as you turn it. In fact I've had a couple that didn't want to come loose until I backed the screw out a turn or two.
To attach the block to the chuck, back the screw out so that just barely protrudes from the end of the screw chuck. Then insert the screw chuck squarely into the hole in the end of the block. With a long screwdriver running through the center of the lathe chuck, tighten the screw into the block until the block is snuggly affixed on the end of the screw chuck. If you don't have a screwdriver that is long enough (and I don't), you might have to remove the chuck from the lathe (like I did). If you have predrilled the hole in the wood block with a Forstner bit as Eugen suggests then you'll have a nice little dimple to start the wood screw into. If the wood is really soft (like some of the poplar that I have been using), you may wish to extend the dimple into a small pilot hole to make sure that the screw "really digs in" to the wood instead of just spinning around and never really catching hold.
Since running a screw into end grain is not all that secure, as an added safety precaution I kept the tailstock pressed against the opposite end of the block until most of the cutting was complete. Then, I backed it out of the way to finish the tip of the roof or house. By this time there was little to cause the block to loosen up.
Since now I don't have to switch from one setup to another, I have removed an entire step from the process. And if you're making a bunch of these ornaments, like I was (and I expect that you might be, too, after your family and friends get a look at them) streamlining the process is a big deal. :-)
As far as the design is concerned, I try very hard to make them all different. When you think about it, round birdhouses don't really make much sense so I just let my inner Dr. Seuss decide what each one is supposed to look like as I turn them on the lathe. That is part of the fun.
Enhancement #2: The Use of Carved Birds
Eugen used "store-bought" birds as the finishing touch to bring a nice splash of bright color to his birdhouses. But I chose not to for two reasons:
* First, I simply couldn't find them. It turns out that they are a "Christmas only" item at the craft store that I visited and with a November 5th craft show deadline looming over me, I couldn't wait for them to show up.
* Second, I'm a woodcarver and using "store bought" birds just wouldn't do:-)
Up until now I have avoided carving birds because...well...they're kind of tough to do. If you look at a bird's body it is just sort of one continuously varying curve. And what's worse, unlike a caricature, if you don't get the curve "completely right" then it looks "completely wrong". But, "These guys are small," I reasoned, "And I don't need much detail." So I proceeded.
Armed with some photos of Cardinals from yet another Google Image search, I cut some little basswood sticks and set out to carve a bunch of birds. It took about 3 birds before I got it right. I went back and touched up the first couple and ended up with some pretty acceptable birds. A little red and black paint and voila...birds! I got tired of all of the Cardinals so I lopped off the topknot from one bird a tried making it into a Bluebird. I got the shape right, but I'm not so sure about the multicolored paint job. So as a result, there was only one Bluebird!
As I write this, it suddenly occurs to me: "Do Cardinals even use birdhouses?" If not, I guess I'll just classify this as another example of "Christmas Magic." :-)
Enhancement #3: Add a little Comedy
My son made an off-hand remark that gave me the idea to make some comical birdhouses. So I carved the back end of Santa Claus, just his boots, pants and white fur border of his coat. I mounted the carved figure trying to squeeze himself headfirst into the birdhouse to deliver Christmas presents for the birds.
Now, I'm anxious to see which sells better, birds or Santa.
Use of "Found" Wood
In both cases, the birdhouse "body" in both shots is Holly (appropriate for the season) with a Cherry roof. Some of the other woods that I used are Tulip Poplar and Wormy Chestnut. I have been trying to use only "found" wood in all of my turnings of late. The Maple came from a beam that my brother pulled out of an old barn in Ohio. The fact that it had been notched the way that they only do in old "Timber built" buildings and that it was just unbelievably cruddy leads me to believe that it is quite old. The Wormy Chestnut was part of a shelf from a building torn down in the 1980s and must be nearly 100 years old. I'm not sure about the holly.
One For the Bench:
"Any time that you enjoy wasting, is not really wasted."
'Til next time...Keep makin' chips!p.s. Sorry for the choppiness of this posting but the posting tool that they gave me is pretty quirky and more than a little buggy:-(.
As I mentioned before, I have been busy getting ready for an upcoming Craft Show in November. But finally, I can reveal a couple of the new spoons for this year’s show. Folks, meet Santa, the Snowman and the Holly Spoon.
I’m reasonably pleased with these spoons and I’m very anxious to see how well the crowd likes them. Because they have more detail and are painted, they take considerably more time to produce than my other spoons. So, unfortunately unless people snap them up, I may have to forego them next year.
There is not much to say about them. They were carved from Basswood, as you have probably already guessed.
The Holly Spoon is a modified version of a common used pattern. I think that I’m going back to the old style. I think the overall balance was better.
I’ve carved several of the Snowman spoons over the years. I used the patented “Lynn Daughty Polka Dot Painting Technique” on this one. It is amazing what a nice job the blunt end of a toothpick will do!
I had a little trouble with Santa this year. I don’t think that he is jolly enough. I’ll have to work on him for next year.
If you’re in the Pittsburgh Area and want to see them in person, send me an e-mail and I’ll tell you where the show is located.
One for the Bench:
"A clear conscience is usually the sign of a bad memory."
I got a little tried of the "old look" and decided to try a new template for the blog. This one lets me spread out the text just a little so the verbiage is less like trying to read a newspaper column.
Personally, I think it is easier to read. Let me know what you think.
One for the bench:
Why is it that most people will believe you if you say that there are invisible subatomic particles but will always test the surface when you leave a note saying that the paint is wet?
I’m still cranking out pieces for a show that is coming up the first week in November, so today I’m going to pull another photo out of the archives to post. I promise that as soon as I have something new to show for my recent efforts, I’ll post it here.
This is a pair of carvings that I did a couple of years ago and is the beginning of an entire set of A Christmas Carol caricatures. Scrooge is about 10" tall and Marley about 8".
I guess the most notable feature is that each figure was carved from a single block of wood. Well, as I think about it I guess that is not completely correct, because Scrooge’s cane and the junk around Marley’s neck are separate pieces. But the basic figure and its base were carved from one piece.
Now-a-days, at the advice of many, I typically carve the head separately so that:
1) the head is out of the way simplifying the carving of the rest of the body,
2) a “mis-carved” head can be discarded if it doesn’t quite measure up to my standards and
3) you can add a lot more personality if you can rotate or cock the head slightly when you glue it on. Its pretty obvious that these guys are just a bit “stiff” and would have benefited from a separately carved head.
I was discussing with Sally, one of the members of my carving club, where I might find a good chain for Marley. She said she had just the thing. She went into her house and returned with a necklace that she didn’t want any more...just a spritz of black spray paint and viola an old, heavy metal chain. I carved a few small locks, ledger books and a cash box to complete the figure.
I hope to some day add at least Bob Cratchit and Tiny Tim.
One from the Bench:
The mind is like a parachute. It doesn’t work unless it’s open.
This is the other carving that I have been holding back in posting because it was a gift and I didn't want to spoil the surprise. I really don't have much to say about the spoon itself, but I'd like to say a little about the parties who received it.
My wife and I threw a big party this past June for our 40th wedding anniversary and invited Dave and Kathy, the spoon recipients, and a bunch of other folks, too.
Dave and I had gone to the same university. We had studied, laughed and had run car rallies together. I remember vividly the night that he introduced me to the "Tummy-buster", the biggest and best hamburger in the state of Ohio! Great eatin', but I'm not sure the place is still there now.
Dave was one of my groomsmen at our wedding, but after that we went our separate ways, Dave to the Army as an Officer and me to industry as an Electrical engineer and later (briefly) as an Air Force enlisted man. We lost track of one another, but about 4 or 5 years ago, on a whim, I decided to Google his name to see what I could find. Sure, enough, there he was! Google managed to kick up an obscure memo with his e-mail address.
So I sent the typical profound sort of e-mail inquiry that this sort of situation requires. You know the type. They generally sound like: "Golly Gee Whiz, are you're the Dave "so-and-so" that graduated from the University of "so-and-so" back in 19XX and drove that rundown, white Corvair?"
In typical "Dave" fashion he quickly responded with, "Why yes, I am...but...uh...you're not going to try to sell me Amway products now, are you?"
Ah, it is so good to know that some things never change. :-)
Although we live many miles apart, we have had some really great times together. Kathy and my wife share quilting and Grandparent experiences while Dave and I have had a chance to share some of our military experiences. A couple of years ago, I was able to show him the site where I spent the majority of my Air Force time "way back when". At the time it was a classified location, now it is just another, non-descript, semi-abandoned, government building enclosed by a chain link fence.
The same day he showed me where he had been in the Pentagon on 9/11. Had the plane been a little bigger or flying a little faster or the building a little less robust or his desk in a different part of the building, he wouldn't have been around to do that.
I've been looking at the information that I get from my "hit counter" and have found that not only do I have readers from all over the world but that some people spend a great deal of time looking at my blog. Someone from Australia spent almost 15 minutes here yesterday! Wow!
Now, I'm not complaining. Far from it. I am genuinely flattered that people want to spend time looking at my carvings and reading what I have written.
I understand that probably woodcarvers and woodcarver "want-a-bees" make up most of the readership. My question to you, the readers, is: "What are you interesting in hearing about or in seeing?" I'd love to make this blog really interesting to everyone. So let me know what you are interested in. One for the Bench:
Some people hear voices. Some people see invisible people. Tragically, many others have no imagination whatsoever.
I was sorting through some stuff that I have collected over the past few years and stumbled over this little piece. I don't think that I wrote it, it doesn't sound like me, but I think that whoever did write it has experienced many of the same things that I experience when I carve.
Renewal - I can create something useful and beautiful from nature. It is a dance we do together. Making a spoon harms nothing and may actually add to the beauty in the world.
Joy - Carving is a joyful pleasure. It allows me to focus, frees my mind from abstraction, and strengthens my hands. The only person I can save is myself, and carving this spoon saves me.
Equality - Anyone can carve spoons.
Symbolism - This small wooden spoon and how it came from my hands is gentle encouragement to me of larger things I might be able to do.
Completeness - In carving a spoon I cut the block from the raw wood and watch the spoon emerge.
Friendship - I honor my friend each time I make a spoon. I only need a few spoons, so I can also honor other people by giving them away.
Democracy - There's orneriness in carving a spoon. It's my way of quietly but emphatically expressing my beliefs. A wooden spoon and plastic spoon say very different things.
Human expression - Each spoon I carve ends up unique. I hope the same for my life and yours.
Usefulness - Carving a spoon makes me be fully present. I listen better. I find that I need to say fewer things because my hands and mind are fruitfully at work. I can wait until my heart is pounding before I need to utter a word.
Humility - Yes, it does all these things for me but, in the end, it's just a wooden spoon.
One for the Bench: When tempted to fight fire with fire, remember that the Fire Department uses water.
Finally, here is one of the pieces that I have been holding off posting. The recipient has not yet received the spoon but she (to protect her anonymity, I'll call her "L") doesn't know (as yet) that this blog even exists so unless she is clairvoyant, I can talk about it here without worry. When her father (I'll call him, "K") gives her the spoon, he can tell her (or not) about the fact that her spoon has been immortalized among these hollowed pages.
This is one of those pieces that almost "wasn't". If you have been following my blatherings you know that up to now virtually all of my Lovespoons have been carved from Basswood. This one is an exception in that was carved from a piece of cherry.
Originally, K" was hoping that I could carve it from Walnut because "L" and her husband (I think it is "C") really like dark wood. Well, I have turned walnut but as yet I have never attempted to carve it. Walnut seems pretty hard and I wasn't sure that I could pull it off. So, instead I suggested that I could power carve the spoon from cherry and just stain it walnut. That was a simple enough plan, or so it seemed. It is a shame that it was fraught with so many pitfalls.
Pitfall number 1 - Although I have done *some* power carving, I really don't consider myself to be skilled in the art and, in retrospect, barely up to the level that this pattern required. The intricate looping of the Celtic Knot exceeded my skill level. I *did* manage to pull it off, but I had to resort to a considerable amount of hand carving and sanding *cleanup*. Oh, and please don't spend a lot of time looking at the back, OK? Thanks! :-)
Pitfall number 2 - Even though I had previously ventured into the folly of applying stain to Basswood and had experienced the unevenness of color that technique produced, I had somehow convinced myself that the same was *not* true of cherry. After all, I thought, cherry is much harder and besides when was the last time you saw a piece of cherry furniture with uneven stain?
What I failed to understand was that the real problem with staining Basswood is not the porosity itself but the difference in porosity between end grain and side grain...and, as I was to discover, cherry is absolutely no different in this respect.
You don't see dramatic color variations in furniture because you see mostly side grain. The amount of end grain is minimal and often hidden from view. But carving, on the other hand, introduces all manners of grain patterns including an inordinate amount of end grain. When you apply stain, the end grain just sucks up the stain like a bunch of microscopic soda straws and that area turns dark.
I can hear you saying, "But, Tom, don't you know about the pre-stain conditioners made to solve that problem?" Yes, I do. In fact I have a can of the stuff in my shop. But I have not been overly impressed with its efficacy on Basswood and besides, as I just mentioned, I had already convinced myself that this wouldn't be a problem because I was using cherry.
The first coat went on dark...I mean really DARK! Particularly, in the knot and the bowl where, not co-incidently, there is a great quantity of end grain. After it dried, I re-sanded and managed to get a lot of the color out. Realizing that there was no turning back I applied a second heavier coat of the stain hoping that it would level out. Well, it did...a little... so here we are.
I sent some pictures to "K" via my sister, who is sort of coordinating this whole project. Since you're reading this, apparently he was pleased enough that the spoon will be given after all. I do hope that "L" and "C" enjoy their Lovespoon.
Don't expect to be reading anything more about using stain on carvings on this blog. I have sworn off stain, thank you very much. From now on, if I take on a carving project that requires a non-Basswood color that can't be obtained using simple, everyday opaque paint, then it will be carved out of wood that already is that color.
Epilog:
Chris Pye, a woodcarver from the UK with whom I can never hope to compare, always ends his newsletter with a section called, "One for the Bench" where he bestows a random piece of wisdom to consider while one's hands are otherwise engaged in carving.
That seems like such a good idea that I'm going o try to do the same thing here. My thoughts may not be as pithy as Chris's but I'll try to be insightful or at least humorous. So here goes...
One for the Bench (The first one):
KNOWLEDGE is knowing that a tomato is a fruit; but WISDOM is not including a tomato in a fruit salad.
"Til next time, keep makin' chip and leave the staining to furniture makers:-)
Now I must say that I’m not much of a sports fan, but the next piece – yet another “oldie” – is one of my favorites. I don’t have much to say about the carving itself. It is about 1/4 scale, carved from Basswood (what else?) and finished with 3 or 4 coats of sanding sealer (sanded with 220 between coats) followed by a hard paste wax. I think turned out rather well, even if I do say so myself. But I think that the story behind the carving is kind of interesting, so here goes:
I carved the Ball and Glove for my brother-in-law. I’ll call him “B”. “B” is sort of my opposite number. He has always excelled in sports, basketball and Baseball in particular…me…uhhhh…not so much. Family pressures many years ago denied him the chance to try it for real after the Pittsburgh Pirates scouted him. Would he have made it? We’ll never know for sure, but I think he probably had a pretty good shot at it.
Shoot ahead 35 years or so, his kids are grown and out of the house and the Pirates begin offering a Fantasy Baseball camp where for a not insignificant sum of money you can spend a week in Florida (right before spring training) and get to play real baseball under the tutelage of former Pirate players and coaches. “B” signed up, did quite well and over the course of the next 10 or 11 years got to play in both Three Rivers Stadium (before they tore it down) and PNC Park. He knows, and is known by, more former Pirates than anyone else I know.
Now, getting back to the carving. The number “27” popped up many times in "B's" life. It was part of his street address in several houses that he and my sister lived in, their zip code, phone numbers and probably some other places, too. So it was natural that given the chance to pick the number for his uniform he chose “27”.
“But the base of the carving has a “4” on it”, you say. OK, I’m getting to that. After about his 3rd or 4th season at fantasy camp, “B” switched his number from “27” to “4” in honor of Ralph Kiner famous for, among other things, hitting a home run in Forbes Field that can be seen in the 1951 film, Angels in the Outfield.
As a kid in the ‘50s, “B” spent many a happy Saturday afternoon in the bleachers of Forbes Field in Oakland (also now torn down) as a loyal member of the Knot Hole Club (remember that?). He idealized Ralph Kiner who he still describes as “A Home Run Hitter and a positive role model for other players…and by extension “Knot Holers”, too.”
The Ball and Glove was carved for “B” for his birthday in 2005, soon after he made the number switch.
I’m still vamping waiting for the time that I can post a few of the specials that I have been working on. So, I’ve been strolling down memory lane -- more specifically through my photo file -- looking for other carvings that I think that people might like to see.
Here are a couple of pieces that I did some time ago for my nearly 4-year old Grandson, Henry's, bedroom wall.
The Sun is and original design and is about 8” across. The Man in the Moon (I’ve done a couple of these) is a little larger and is based on a picture I found out on the web someplace. As usual, they are both carved out of Basswood.
I hope you like them and soon I’ve have some new stuff to show…I promise!
Here’s a second, more abbreviated, Nativity Set that I carved about three years ago for a charity auction.
While it consists of only three figures, each is quite a bit larger its counterpart in the original set: about 9-1/2” versus 6-1/2” tall. Otherwise, the figures are nearly identical.
In this piece, the base is actually notable. It is turned from a piece of nearly 100 year old wormy chestnut that spent about half of its life as a shelf in the storeroom of an industrial building here in Pittsburgh. When the building was demolished in the 1980s, my current boss rescued a couple pickup truck loads of this highly desirable wood. And now he has made some of his stash available to me. Thanks, John!
It's been a while since I have posted anything. I vowed that I wouldn't do that, but things have been kind of busy here with two business trips almost back-to-back. I *do* have a couple things that I *could* post now, but because they are gifts I can't disclose their existence yet. But I will post them as soon as I can.
In the meantime, I have a few older things that I have yet to post. I carved the nativity scene pictured here for my daughter and her family about 5 years ago. (The color in the overall shot is much too red. The basswood looks much more like the individual pieces below.) I carved most of it the first year and then added a few fill-in pieces (the sheep, Ox, camel and stable) over the course of the next year or two.
All of the pieces shown are my original design. Early on I was photographing my figures with a mirror so that you could look at two sides at once, as below.
The manger is carved with two inset pieces, one with just the hay and one with the Babe in the hay. That way, Baby Jesus doesn't arrive until Christmas Eve.
I hope you like it. If you do please feel free to comment.
Believe it or not, I actually *did* come up with this idea on my own. Although, I *do* have to admit I was *greatly* influenced by an image that I found during one of my many -- Yeah, you guessed it -- Google Image searches.
The image I found looked like it was probably a single cartoon film cell (no, I don't know who did it. In fact I don't seem to be able even *find* it again) showing two elaborately decorated spoons positioned on a dance floor in a rather typical “Dancing with the Stars” dip position.
I wanted to come up with something new and different to have as a table decoration at this year’s Christmas Craft show and I think I finally found it. I have no real desire to sell it -- its real purpose is to generate customer interest -- so I’ll have it there with a ridiculously high price tag on it. But, of course, in the event that somebody *really* likes it and isn’t driven off by the price, I may have a tough decision to make. :-)
This was one of those projects that I wasn’t positive that I was going to able to pull off until it was almost done. After I drew up and carved the spoons, I drilled a small hole the tip of each of the bowls and glued in a dowel rod into each one for support. But until I temporarily slipped these dowel rods into holes in a piece of scrap wood and held one spoon against the other, I still didn’t know exactly how, or even *if*, they would fit together.
When I carved the “man spoon”, I left a little extra *meat* on his right hand. Holding the two spoons together with one hand, I scribed the arc that was required to accept the “lady spoon’s” right shoulder with my other. I carefully scooped out this area in “his” hand (*repeatedly* checking the fit, believe me!) to accept “her” shoulder.
Once they seemed fit together the way I wanted, I shaped the rest of his hand and veeeeeeeery carefully drilled a hole through “his” hand (from the rear) into “her” shoulder, taking great care *not* to punch all the way through. I then glued a small piece of dowel rod into “her” shoulder to hold them together during final assembly.
I cut a sort of semi-randomly shaped piece of cherry to use for the base (it seemed to me that symmetry would not work well here) and carefully transferred the mounting holes making sure that their spacing and angles exactly matched those in the scrap wood base.
Much sanding and finishing later, I glued the spoons to each other and to the base. I added supports and rubber bands to hold everything steady, carefully mopped up all of the glue drips and went off to bed hoping that everything would actually hang together. I spent much of time before sleep finally overtook me imagining how and where I would add all of the small gusset plates that I *just knew* I would need to hold things together when the glue wasn’t enough.
Fortunately, while I slept, my faithful and resourceful magic wood glue fairies did a good job to make everything marvelously solid. Even so, I still intend to handle it with kid gloves. :-)
The only thing left to add is a small, engraved brass plate on the sloped area on the left side.
Here is a Lettered Lovespoon that I just completed for a young couple who is getting married in late June. Like most of my other Lovespoons, it is an original design carved from the traditional Lovespoon material, Basswood.
I try to follow a couple of personal “design rules” when I’m commissioned to carve a Lettered Lovespoon. There’s no real good reason for these rules, you understand, they’re just my rules.
Rule #1: The Lady’s initial goes on top, the Gentleman’s on the bottom.
Rule #2: The letters are *always* linked together. Come on, this *is* a Lovespoon after all and a couple should be…well…linked together like the letters.
The letters always have a way of telling me how *they* want to displayed on the spoon. Because the grain of the wood runs the length of the spoon, wide letters, like the “R” in this case, are often a problem in that they need a lot of extra support to keep their ends from just snapping off, either during the carving process or handling before the spoon is hung on the wall. I took advantage of the width of the heart-shaped bowl to provide support for the “R”.
Having said that, however, because the tips of the “S” and the “R” stick out with very little “meat” to anchor them, the spoon will be best served hung well out of plate-throwing range. :--)
When I attempted to hook the “S” into the “R” (per my rules), the arrangement just didn’t work for me visually because everything seemed to be squashed together at the bottom of the spoon leaving the top of the handle looking more than just a bit little naked.
After some playing around on paper, I finally decided to include a set of interlocked wedding rings between the two initials. Wedding rings are a common Lovespoon adornment but not one I had used before. Using the rings -- locked into the “R” and into the “S” -- allowed me to slide the “S” up the handle for a more balanced look. Everything is still interlocked so in my mind, at least, I haven’t violated my design rules.
I am pleased that I was able to make the handle disappear behind the two rings without jeopardizing the overall structural integrity of the spoon.
As soon as I began carving, I realized how much right-over-left-over-right-over-left there was going on around the rings. This was a tough spoon to carve! In retrospect, I think that I should have spread everything out just a bit more.
A long time ago I started using Sanding Sealer rather than varnish or shellac on spoons, because IMHO, it seems to make a harder finish and, in the case of the basswood, adds some color. I used 3 coats of sealer (sanding with 220 sandpaper between coats) followed by buffing with #0000 steel wool and a good coat of paste wax. The finish came out wonderfully smooth.
My spoon and my best wishes go out to the soon to be “Mr. and Mrs.”!