I can't take all of the credit for what you see because, by and large, I stole the techniques lock, stock and barrel from an on-line article by Eugen Schlaak at www.woodturningonline.com/Turning/Turning_content/Bird House.pdf (Note: You might have to copy that link and paste it into your browser, clicking on this Hyperlink seems to be problematic, at least for my browser.).
However, I do claim a little credit for one enhancement that I made to his technique and for some added, hand-carved touches. I suggest if you would like to make one (or more) of these delightful ornaments that you start with his excellent instructions and then augment them with my suggestions.
Enhancement: The Use of "Jam Chucks"
I tried following Eugen's directions but I don't have a cool mini-fingered chuck like his, so I had difficulty gripping the narrow edge of the partially turned piece when I reversed it for the final steps. It kept popping off if I put even a small amount of pressure on the wood as it turned.
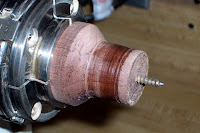
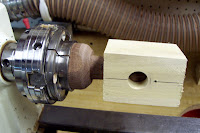
So, I ended up turning two "Jam Chucks" to hold the two pre-drilled blocks, one for the roof and one for the "body" of the house. Strictly speaking, I guess these aren't really "Jam Chucks" because a true jam chuck uses only friction to hold the wood and these have an internal, hidden screw to lock everything down. So, for the purpose of this blog I guess these should be considered "Screw Chucks" although I have never seen that expression used.
The first chuck is 1" in diameter to fit the hole that is drilled into the bottom ("body") block. The second one is 1.25" in diameter to fit into the top ("roof") block. Since it is considered "bad form" to show up at the local wood turner's club (or anywhere else for that matter) with bloodied knuckles, when you make your chucks be sure to make the "neck" on each of them long enough ensure that the rotating lathe chuck jaws can't scuff up your knuckles while you're turning or sanding.
 As I mentioned, the thing that really holds the wood block in place is the long woodscrew that runs through the middle of the jam chuck. Drill a dead-center hole through the chuck and countersink it deep enough to permit a long #10 woodscrew (or bigger) to stick about 1/2" out the "business end" of the chuck when fully cranked down. The direction of the woodscrew threads causes the block to tighten onto the screw chuck as the lathe tools work against the wood so the block actually becomes tighter as you turn it. In fact I've had a couple that didn't want to come loose until I backed the screw out a turn or two.
 To attach the block to the chuck, back the screw out so that just barely protrudes from the end of the screw chuck. Then insert the screw chuck squarely into the hole in the end of the block. With a long screwdriver running through the center of the lathe chuck, tighten the screw into the block until the block is snuggly affixed on the end of the screw chuck. If you don't have a screwdriver that is long enough (and I don't), you might have to remove the chuck from the lathe (like I did). If you have predrilled the hole in the wood block with a Forstner bit as Eugen suggests then you'll have a nice little dimple to start the wood screw into. If the wood is really soft (like some of the poplar that I have been using), you may wish to extend the dimple into a small pilot hole to make sure that the screw "really digs in" to the wood instead of just spinning around and never really catching hold.
Since running a screw into end grain is not all that secure, as an added safety precaution I kept the tailstock pressed against the opposite end of the block until most of the cutting was complete. Then, I backed it out of the way to finish the tip of the roof or house. By this time there was little to cause the block to loosen up.
Since now I don't have to switch from one setup to another, I have removed an entire step from the process. And if you're making a bunch of these ornaments, like I was (and I expect that you might be, too, after your family and friends get a look at them) streamlining the process is a big deal. :-)
As far as the design is concerned, I try very hard to make them all different. When you think about it, round birdhouses don't really make much sense so I just let my inner Dr. Seuss decide what each one is supposed to look like as I turn them on the lathe. That is part of the fun.
Enhancement #2: The Use of Carved Birds
 Eugen used "store-bought" birds as the finishing touch to bring a nice splash of bright color to his birdhouses. But I chose not to for two reasons:
* First, I simply couldn't find them. It turns out that they are a "Christmas only" item at the craft store that I visited and with a November 5th craft show deadline looming over me, I couldn't wait for them to show up.
* Second, I'm a woodcarver and using "store bought" birds just wouldn't do:-)
Up until now I have avoided carving birds because...well...they're kind of tough to do. If you look at a bird's body it is just sort of one continuously varying curve. And what's worse, unlike a caricature, if you don't get the curve "completely right" then it looks "completely wrong". But, "These guys are small," I reasoned, "And I don't need much detail." So I proceeded.
Armed with some photos of Cardinals from yet another Google Image search, I cut some little basswood sticks and set out to carve a bunch of birds. It took about 3 birds before I got it right. I went back and touched up the first couple and ended up with some pretty acceptable birds. A little red and black paint and voila...birds! I got tired of all of the Cardinals so I lopped off the topknot from one bird a tried making it into a Bluebird. I got the shape right, but I'm not so sure about the multicolored paint job. So as a result, there was only one Bluebird!
As I write this, it suddenly occurs to me: "Do Cardinals even use birdhouses?" If not, I guess I'll just classify this as another example of "Christmas Magic." :-)
Enhancement #3: Add a little Comedy
 My son made an off-hand remark that gave me the idea to make some comical birdhouses. So I carved the back end of Santa Claus, just his boots, pants and white fur border of his coat. I mounted the carved figure trying to squeeze himself headfirst into the birdhouse to deliver Christmas presents for the birds.
 Now, I'm anxious to see which sells better, birds or Santa.
Use of "Found" Wood
In both cases, the birdhouse "body" in both shots is Holly (appropriate for the season) with a Cherry roof. Some of the other woods that I used are Tulip Poplar and Wormy Chestnut. I have been trying to use only "found" wood in all of my turnings of late. The Maple came from a beam that my brother pulled out of an old barn in Ohio. The fact that it had been notched the way that they only do in old "Timber built" buildings and that it was just unbelievably cruddy leads me to believe that it is quite old. The Wormy Chestnut was part of a shelf from a building torn down in the 1980s and must be nearly 100 years old. I'm not sure about the holly.
One For the Bench:
"Any time that you enjoy wasting, is not really wasted."
'Til next time...Keep makin' chips!
p.s. Sorry for the choppiness of this posting but the posting tool that they gave me is pretty quirky and more than a little buggy:-(.

No comments:
Post a Comment