 |
| No. 119 |
After six years of construction on the Transcontinental Railroad, the trailheads of the Union Pacific and the Central Pacific railroads finally met at Promontory
Summit in the Utah Territory on May 10, 1869.
To commemorate the completion of this incredible accomplishment, two locomotives, the Union Pacific's westbound "No. 119" and the Central Pacific's eastbound "Jupiter" came together until their cowcatchers were separated by less than the length of a single railroad tie. Four spikes, two made of Gold from California, one made of Silver from Nevada and one made of Gold, Silver and Iron from Arizona were driven into the final tie while the message: "Dot...Dot...Dot...Done" was flashed from coast to coast by telegraph.
I understand that my accomplishment here pales in comparison to laying a couple of thousand miles of railroad tracks, but about a year ago, I produced a model of the "Jupiter" for John, my one boss, in honor of his 20th anniversary with our company. That might sound like an odd subject for an anniversary present, but when your company makes railroad equipment, it actually *does* make sense.
This week, my other boss, Harry, finally caught up and celebrated his 20th anniversary. It was only fitting that he should receive a model of the *other* of these two historic locomotives.
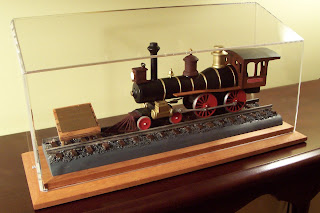
Just like the "Jupiter", old "No. 119" was made primarily of Basswood although there are a few odds and ends that I fashioned out of small dowel rods and other wood scraps. I turned the boiler, smokestack, sand and steam domes, cylinders, bell and wheels on the lathe and then assembled the cab, cowcatcher and drive rods from hand-carved/cut pieces.
The roof of the cab was covered with a piece of 220 grit sandpaper painted black to simulate rolled roofing. The track measures 16" long and the case makes the overall length about 2" longer. I
do hope that Harry has room for this relatively large piece in his new house:-)
The two locomotives are "nominally" of the same scale. Unfortunately, the lack of any drawings and only a few good photos -- those taken at right angles to the train so I could actually measure things -- made it very difficult to get them to agree in all details. I
did do a much better of getting the gauge of the tracks correct on this locomotive. The wheel spacing was far too wide on the first locomotive, once again because I couldn't locate any really good photos or drawings to work from. It looks great from the side but sadly way out of scale when viewed head on.
After it was all said and done, I realized that I had actually built both models "upside-down". In real life, the locomotives of the day were built from the ground up and as I see now that methodology is preferable for building models, too. It probably would have forced the design to be more accurate if I had started with a specified rail spacing and built the wheels, frame and body to match. Getting the rail spacing to exactly match the wheel spacing of an already completed model was much tougher - to say nothing of less forgiving - than it would have been the other way around.
I
did get a little smarter this time when it came to the finish. In my opinion, the "Jupiter" suffered from a serious case of "Model Fuzz". No matter how well I sanded it, the texture of the wood still showed through the paint. This time, I used a couple of coats of sanding sealer on the boiler, stack and domes -- sanding between coats with 220-grit sandpaper - prior to painting. Then when I applied the acrylic paint, it went onto an already smooth, hard surface. That worked much better!
I
also spray-painted all of the brass items. The metallic, acrylic brush-on paints (e.g., brass, gold, silver) that I have run across must use actual metal pigments mixed with a vehicle that is very transparent. They always seem to go on "chunky" and require quite a number of coats for good coverage. That might work on a big item or something that wasn't supposed to be made from metal but on something this small, it looks really bad.
Another gentleman produced the beautiful, slope-top Plexiglas case and cherry wood base for this train as well as John's last year - Thanks, Ken.
 |
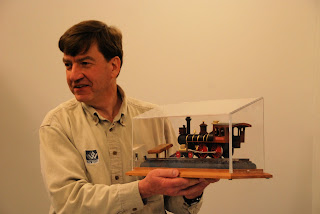
| Harry and his Train |
One bit of trivia I learned during my research on these two locomotives is that you can tell what type of fuel a steam locomotive uses by the shape of the smoke stack:
The "Funnel" or "Cabbage" stack locomotives (like the "Jupiter") burned wood and needed the huge stack so as not to set the tracks or surrounding forests ablaze as the train passed through. Apparently, the larger stack allowed for baffles and screens that let the hot gases and smoke escape while any solids, including glowing embers, swirled around and eventually fell down into a chamber for later cleanout.
Coal-burning locomotives had straight stacks that may or may not have had any sort of "ember-trapping" screens.
One from the bench
He who knows others is wise. He who knows himself is enlightened.
"Til next time...Keep makin' chips!


