Painting
I wasn't all that pleased
with the color and texture of the metal parts of the 1884 Springfield Trapdoor
Rifle that I had carved about 5 years ago (see below). I vowed that this time
my results would be much better.

Close up of Trapdoor Rifle Replica.
Note the flat “cast iron” look of the Lock and Hammer
The acrylic paint that I used on the rifle looked
"OK". It has fooled a lot of
people, particularly if they are more than 4 feet away. It looked "old", which is what I
was going for but it just didn't look all that "metallic" to me.
The finish was flat and looked like it had been "piled on", which was exactly
what it was, the result of many, many washes of all sorts of colors.
I took the unpainted revolver with me to discuss the paint selection with the guy at my favorite hobby store to see what he would suggest. He recommended a 2-step, Spray-on lacquer from Testor's to make it look more like metal. The first coat was Number 1454 "Titanium" Model Master Buffing Metalizer. Since this was going to be an "all-or-nothing" kind of procedure, it required a lot of thought, quiet meditation and mental preparation before I was ready to commit to the paint application. I really didn't want to ruin my work so far. Finally, I realized that if this methodology didn't work out, I was no worse off than I was the last time. So I took the plunge!
At first, I was more than just a bit disappointed when I saw the results...the finish looked way too flat...not much of an improvement over the acrylic.
However, the hobby store guy made a big point of telling me that this paint requires "buffing" to bring out the shine. Sure enough, once it was dry -- which only took about 10 minutes -- a few seconds of buffing with a Facial Tissue and it began to shine. The frame and barrel looked "old and shiny" just the way I hoped it would. The second step is essentially a "clear coat" (Testor's 1459) to seal and protect it.
This photo was taken before I got around to applying the antique brass color to the trigger guard and finalizing the color and finish on the handles, but after what happened so far those things should be a piece of cake...or so I thought!

Preliminary
Photo of 1861 Remington Revolver
(the trigger guard and handles were not complete) |
I already posted this next part but I think it is important enough to repeat.
The antique brass paint went on without a hitch. When I dried I decided to give the “now
complete” revolver a good, protective coat of paste wax as I do with nearly all
of my carvings. Unfortunately,
that is where I discovered:
Cautionary Note #1 - When using the lacquer based
finishes, DO NOT use a paste wax to seal the carving. The solvents therein will attack the lacquer.
The antique brass colored paint that I had applied to the trigger guard was extremely sensitive and much of it just came off in the application rag. After a suitable amount of recovery time had expired -- not for the finish, but for my psyche -- I carefully re-sanded the trigger guard to ensure that the wax was completely gone and then reapplied the antique brass paint. “Job done”, right? Yes, you’d think so, but then you would be wrong.
The antique brass colored paint that I had applied to the trigger guard was extremely sensitive and much of it just came off in the application rag. After a suitable amount of recovery time had expired -- not for the finish, but for my psyche -- I carefully re-sanded the trigger guard to ensure that the wax was completely gone and then reapplied the antique brass paint. “Job done”, right? Yes, you’d think so, but then you would be wrong.
You have
probably heard of the corollary to Murphy's Law called "the Law of
Selective Gravitation" which states that "A dropped tool will always
land where it can do the most damage". Well, I encountered yet
another corollary to that corollary.
After
completing the painting of the trigger guard I placed the revolver on the
Mantle to "keep it out of harm's way". But instead of laying it
flat where there was the risk of "perhaps" scraping it against the
rough brick surface along the back wall, I propped it up so that the trigger
guard wouldn’t touch anything. About 2 hours later, I encountered a third
corollary.
Cautionary Note #2 - When storing a finished, but
oddly shaped carving on the Mantle, do not prop it up but instead lay
it flat.
I heard a loud
noise and checked to see what had happened. Whether it was due to some
localized seismic event or just a passing of some unhappy apparition, the
revolver was on floor sporting a very nasty crack right below the barrel. I was sick!
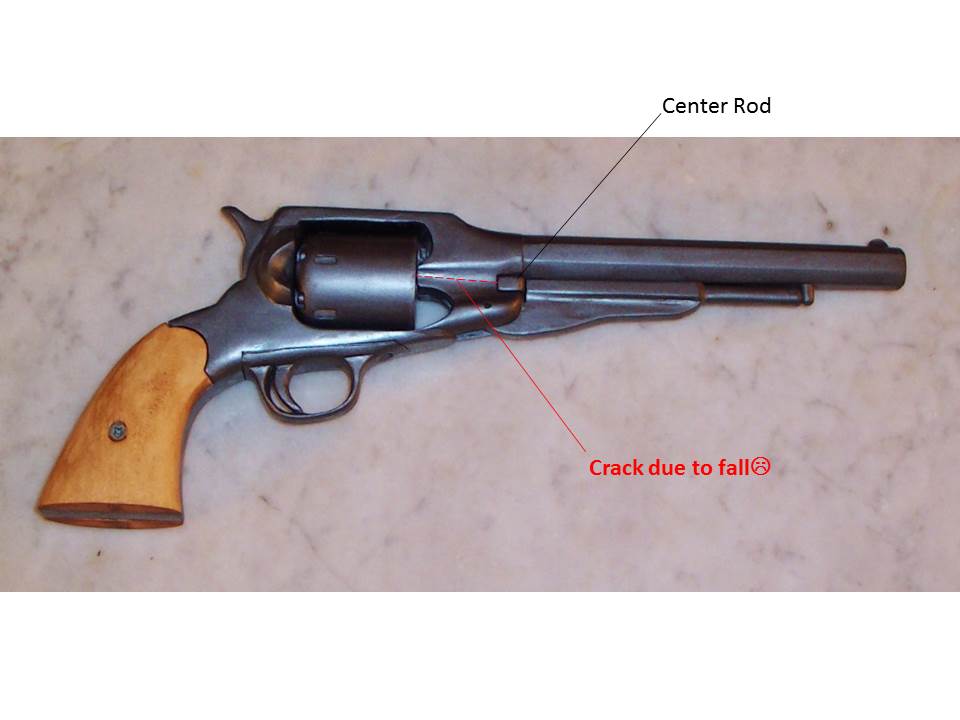
Location
of Crack due to Fall from Mantle
|
Fortunately,
using a little Elmer's Glue and a nice big rubber band I was able to mend the
flaw. As you might expect, the crack occurred at the weakest point: under
the barrel, at the thinnest part of the frame and right where the cylinder
center rod goes through. The glue managed to savage the entire project.
There is a small, barely visible scar left where I added the glue. I did
have to sand the -- now misshapen -- center rod hole a bit to get the rod back
in place.
What this did is confirm that in order to ensure that the carving remains in one piece, I will definitely have to go ahead with my idea of placing the revolver in a "presentation" box. Manual fondling of the revolver is -- Apparently -- no longer a reasonable consideration.
What this did is confirm that in order to ensure that the carving remains in one piece, I will definitely have to go ahead with my idea of placing the revolver in a "presentation" box. Manual fondling of the revolver is -- Apparently -- no longer a reasonable consideration.
Final
Pictures

Left
Side View

Left
Side View with Loading Lever Down

Right Side
It was quite a long haul. There were a lot of little pieces with a lot of places to make mistakes (I made 'em) but I am quite pleased with the results. Now to get the other pieces finished and get them into the presentation box.
I hope you found this interesting.
'Til Next Time...Keep Makin' Chips!

2 comments:
looks really great! How about a holster and belt to display it in?
I plan to go the other way building a velvet lined "Presentation Case" complete with replica copper powder flask and bullet mold.
Post a Comment